10 Easy Yoga Moves to Seriously De-Stress

Feeling a little stressed? Between exams, work, family time, running errands, and a full social calendar, you might find yourself a little more stretched than usual. So we caught up with private yoga instructor Shayna Skarf to design a quick-bliss yoga routine to help you get through it.
And she's been right there herself. “In graduate school, I spent hours upon hours, days upon days, weeks upon weeks sitting in front of my laptop and stacks of books in libraries and cafes,” says the New York City-based yoga instructor, who discovered yoga while studying for her Ph.D. in English. “The physical abuse I inflicted on my body by forgetting to stretch or change position, by eating poorly and neglecting to sleep, by chronically tensing certain muscles was symptomatic of a greater imbalance in my life.”
“Taking ten minutes now will give your body the boost it needs to get through the rest of the night and face that early morning exam,” says Skarf, who practices Forrest yoga, a mindful and therapeutic yoga created by Ana Forrest to address the physical and emotional stresses of modern life.
“These yoga poses reduce stress, ease back and neck pain, and help your brain to function and focus,” says Skarf. And it doesn’t take yogi-like dedication to see results, she says. “As you feel your leg cramp or your back ache, why would you not take 15 minutes to soothe your muscles, brighten your energy, and send fresh blood to your brain? Just grab some padding, a towels or a blanket, remove your socks, and get to it.”
Note: Unless otherwise noted, remain in each pose for 3-5 breaths.
1. Seated Side Bend with Neck Release
Benefits: Reduces stress; relieves neck pain; increases blood flow; and helps the brain function and focus.


Sit in a cross-legged position
Place left hand 18 inches from left hip on fingertips
Inhale: reach right arm up
Exhale: reach right arm over right ear, then flatten left hand down
Relax neck to the left and left ear toward the shoulder
Move left shoulder down away from left ear
Stay 3-5 breaths
Stretch right arm down until it is 12 inches from the floor, feeling with the arm for the angle that stretches the right side of the neck
Stay 2-3 breaths
Leaving head relaxed, inhale, and reach through right arm to pull yourself up to a seated position
Use left hand to pick head up, keeping neck relaxed
Switch sides
2. Bridge
Benefits: Calms the brain and central nervous system; decompresses the low back; alleviates stress and depression; improves circulation of blood; and restores focus.

Lie down on your back with soles of your feet on the floor, with your feet slightly wider than hip-distance apart and parallel
With your feet under knees, reach down touching fingertips to heels to measure distance
Slide shoulder blades down the back
Curl pubic bone toward the navel, lifting pelvis off the floor
Keep neck relaxed and arms passive
Breathe into chest, widen the diaphragm and ribs, lengthening the spine
Keep tailbone tucked, pubic bone curling toward the navel
Move thighs and knees away from pelvis
Tuck tailbone up as you bring upper back, middle back, then lower back down; keep neck still
3. Chair
Benefits: Strengthens ankles, thighs, chest, and spine; decompresses the low back; helps with fatigue; heats the body and deepens the breath; increases blood circulation.

From a standing position, sit back against the wall
Walk the feet away from the wall about 2 feet (thigh-length from the wall)
Bend the knees until thighs are parallel to the floor, ankles should be directly under the knees. Feet and knees can be together or a few inches apart
Press entire back and the back of the skull up against the wall, hands can be down by the hips or reaching up, back of hands moving toward the wall or on the wall
Keep head on the wall and use abdominals to press lower back into the wall
Legs are in a right angle unless there’s knee pain (for knee pain, bring hips up the wall so the thighs are up above parallel to the floor)
To come out of the pose: put hands by the hips on the wall, brace with the hands, straighten the legs, can come into Forward Bend with sit bones on the wall (see next pose) or to standing
Come out of the pose smoothly without jolting the knees
4. Standing Forward Bend
Benefits: Reduces fatigue and anxiety; lowers blood pressure; builds flexibility in hamstrings, calves, and hips; relieves headaches and insomnia.

Stand about a foot and a half away from the wall, feet can be together or slightly apart
Gently lean sit bones on the wall
Exhale: fold forward
Keep feet active, lifting and spreading toes
Let arms hang, and keep neck relaxed
To come out of the pose: curl up slowly, letting the head hang
Use heel of hand on the center of forehead to raise head upright
5. Low Cobra
Benefits: Increases blood flow; stretches chest, shoulders, and abdomen; helps reduce stress and fatigue; stretches low back; opens heart and lungs; deepens breath and restores focus.
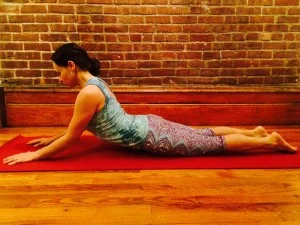
Lay flat on belly, move arms forward so elbows are underneath the shoulders, elbows shoulder-distance apart
Lift elbows 1 inch off the ground, tuck tailbone down
Tuck tailbone toward heels, squeeze front of thighs and ankles towards each other
Inhale: lift chest, expand ribs forward toward fingertips, neck relaxed
Press pubic bone into floor to lengthen out the low back
Slide shoulder blades down the back as you lift chest
Breathe into chest, lengthen rib cage away from pelvis
Traction chest forward as you lie down. Put hands under shoulders, palms down
6. Downward Dog
Benefits: Reduces stiffness and back pain; increases blood circulation; relieves anxiety and fatigue; stimulates brain function and restores focus.

From hands and knees position, set your hands on the ground shoulder-distance apart
Inner hands pressing down, fingers wide
Inhale: Broaden upper back by spreading shoulder blades away from each other and lifting segment of spine between shoulder blades
Release head, relax neck
Exhale: lift into the pose by pushing into feet and lifting hips. Knees can remain slightly bent or straighten with kneecaps lifted
Move collarbones toward the feet
Lengthen spine, shift weight into heels
7. Warrior II with Shoulder Shrugs
Benefits: Reduces stress and fatigue; relieves neck and back pain; increases blood circulation and respiration; opens chest and lungs; strengthens hips, legs, and shoulders; energizes tired limbs; builds stamina and concentration.


Stand with your feet 4-5 feet apart, depending on leg length
Front heel in line with center of back arch, back foot turned in 30 degrees
Align face with the chest (do not twist neck to turn head forward)
Inhale: arms reach out wide in direction of legs and spread through fingers
Exhale: bend front knee to a right angle
Slide shoulder blades down the back
Keep ribs lifting, neck soft
Tuck tailbone and lift sternum
Shoulder Shrugs:
Relax arms by your sides
Inhale: hold the breath and lift your shoulders up by ears (keep arms relaxed)
Still holding breath, squeeze shoulders straight back, keeping shoulders lifted
Exhale: Squeeze the upper shoulder blades together and drag them down 1-2 inches
Inhale into the upper back and relax the shoulders
Exhale: keep arms relaxed and squeeze mid shoulder blades together and drag them down 1-2 inches
Inhale into upper back and relax the shoulders
Exhale: squeeze the lower tips of shoulder blades together. To access the bottom tips of shoulder blades, bend your elbows and turn your arms out to the side, squeezing lower tips of shoulder blades together and drag them down the back
Repeat shoulder shrugs a second time, keeping arms passive
Switch sides
8. Extended Warrior Variation
Benefits: Relieves pain in the neck; increases blood circulation; improves respiration; alleviates fatigue; energizes tired limbs; builds strength and stamina.
From Warrior II Position:

Set left forearm on left thigh
Inhale: arch chest forward
Exhale: bring right arm behind the back, taking hold of left thigh or whatever is reachable (i.e. clothing at left waist)
Press down on left forearm in order to open left shoulder
Relax left ear toward left shoulder without collapsing the left shoulder
Tuck tailbone, lift ribs out of waist and low back
Keep the left knee directly over the left heel
Switch sides
9. Easy Twisting Lunge
Benefits: Reduces anxiety; relieves back and neck pain; increases blood flow; stretches the spine; restores focus.

With your left foot forward and right knee down on extra padding, align left knee over ankle, right knee directly under hips (both knees bent at 90 degrees)
Front foot hip-distance from the line of the back knee
Right hand on floor 12 inches to inside of left foot
Left arm reaches up and back opening the chest
Arch chest, lean back away from front leg, lengthen ribs from belly and lift chest away from lower ribs
Switch sides
10. Pigeon
Benefits: Reduces anxiety; lowers blood pressure; relieves lower back pain and stiffness; opens the hips and releases stress and emotional blockage.
From Downward Dog position (above):

Bring left knee between hands, left foot tucked in close toward the right hip (or extended out to form a wider angle with the left thigh, depending on flexibility)
If the knee hurts, sit all the way down on left hip to take pressure off of the knee and allow the right leg to splay out a little. Otherwise, right leg is straight back from pelvis, top of thigh faces down onto floor
Back toe reaches away from torso, front foot is flexed
Lay torso down over front leg
Can rest on forearms or rest chest on front leg
Relax the neck
We bet more than your neck is relaxed now.